Quiz Generator - Simple Quiz Platform where AI Creates Quizzes made with AWS Amplify
Article for AWS Amplify on 2023 July's Hackathon Submission


Table of contents
- Introduction
- 1. The Problem
- 2. The Solution and Motivation
- 3. Demo and GitHub Repository
- 4. Features of Quiz Generator
- 5. Amplify Features I used in Quiz Generator
- 5.1 Figma to react (UI Library) on Amplify Studio
- 5.2 Data modeling on Amplify Studio
- 5.3 UI Library on Amplify Studio
- 5.4 Authentication on Amplify Studio
- 5.5 Amplify Data Store
- 5.6 Amplify hosting
- 5.7 Amplify Domain management
- 5.8 Form Builder (React)
- 5.9 Environment variables
- 5.10 Data Content Management on Amplify Studio
- 6. Other Technology Used in Quiz Generator
- 7. About Me
- 8. Conclusion
Introduction
Quiz Generator is the Simple Quiz Platform where AI Creates Quizzes.
You can set the subject and level and the AI will create the quiz for you. When you answer, the correct or incorrect answer and an explanation will be displayed. You can also see the ranking of the percentage of correct answers and the number of quizzes answered by each user.
Check out Quiz Generator - Simple Quiz Platform where AI Creates Quizzes
1. The Problem
There are many quiz apps out there, but most of them require you to type in the quiz yourself, which is not practical for easy play. few of those with AI auto-generation are easy to use, and none of them support multiple languages.
2. The Solution and Motivation
We decided to develop Quiz Generator because we thought it would be easier and more enjoyable if there was an application that focused on automatic quiz generation by AI, and if it supported multiple languages, people from many countries could enjoy it.
3. Demo and GitHub Repository
Demo: (https://quiz-generator.tanosugi.com)
GitHub Repository: (https://github.com/tanosugi/quizgenerator)
4. Features of Quiz Generator
4.1 Quiz Generation
Set the subject and level and the AI will create the quiz for you.

4.2 Quiz Answering Function
You can answer the quiz. When you answer, correct or incorrect answers and explanations will be displayed.


4.3 Ranking Function
You can also see the ranking of the percentage of correct answers and the number of quizzes answered by each user.

4.4 Multi-Language Support
English, Japanese, Chinese, and Spanish, Portuguese are supported. Not only will the menu be displayed in the selected language, but the quiz, answers, and explanations will also be displayed in that language!


5. Amplify Features I used in Quiz Generator
5.1 Figma to react (UI Library) on Amplify Studio
First, I created the design in Figma and then coded it with the Figma to React functionality. all components, including Nav bar, were generated from Figma.
In another previous project, we also used Figma's prototype feature, but we omitted it this time because we can quickly turn it into a React web app.

5.2 Data modeling on Amplify Studio
Next, I created the necessary data model by looking at the design, which is very convenient because you can create it in the GUI while selecting the type. So you need to work carefully and keep the number of modifications to a minimum.

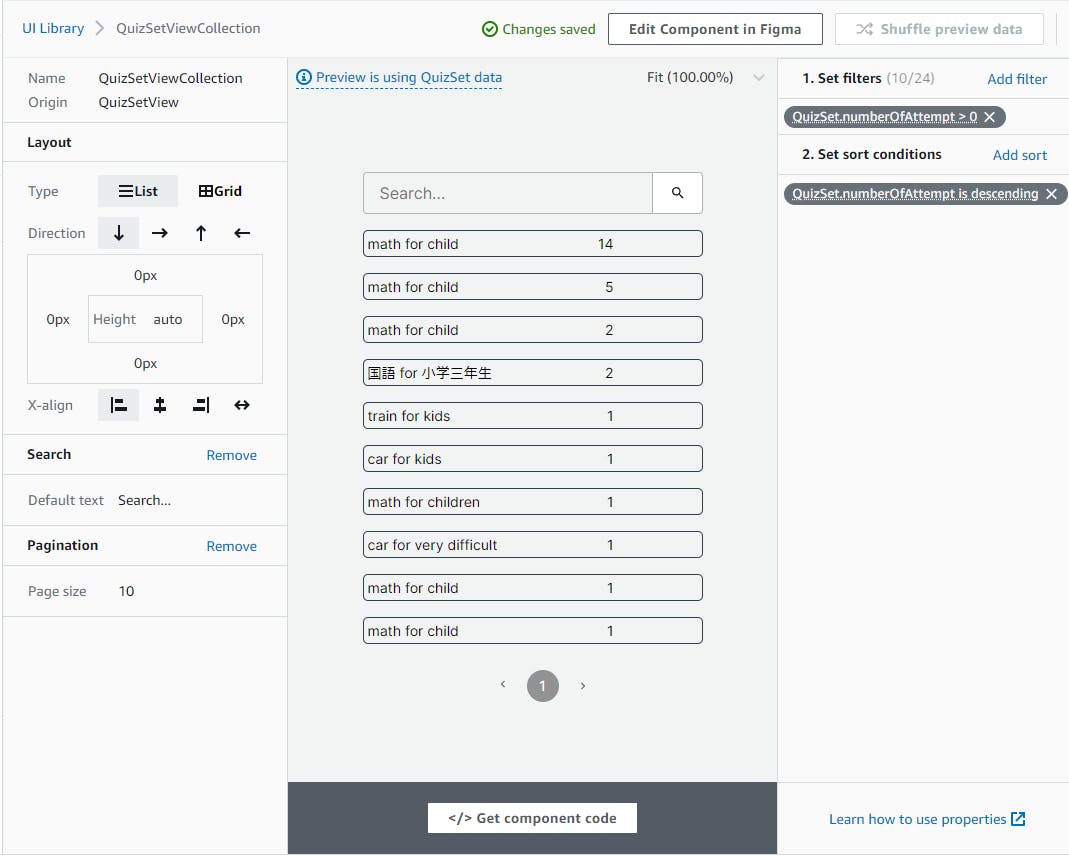
5.3 UI Library on Amplify Studio
Next, connect the component to the data model. You can use the override function in code, but it is more efficient to work in GUI on Amplify Studio. Create a collection as well. The ranking table is created using this function.

5.4 Authentication on Amplify Studio
Introducing Authentication was extremely easy. You can click on Amplify studio GUI and paste code from the tutorial. It was a little complicated to use Google login through OAuth 2. The following three steps are necessary.
add Google Login on Amplify Studio
add credentials on GCP
Copy redirect URL from Amplify Studio to GCP
Copy Web Client ID and Web Client Secret from GCP to Amplify
set environment variable on AWS management console. Web Client from GCP to AMPLIFY_GOOGLE_CLIENT_ID and Web Client Secret from GCP to AMPLIFY_GOOGLE_CLIENT_SECRET Please refer to the following screenshots.

5.5 Amplify Data Store
The data designed in Data modeling is reflected in the components in the UI Library as much as possible, but some of it needed to be processed, so we wrote the code. It is quite easy to query data in Data Store and apply it to components in overrides.
const fetchQuiz = async () => {
    const resp = await DataStore.query(Quiz, (c) => c.quizsetID.eq(quizId));
    console.log("resp:", resp);
    setQuizs(resp);
    setQuizLength(resp.length);
  };
 <QuizItemSolveView
          overrides={{
            time: { children: `${t("sec")} : ${time}` },
            problems: { children: `${currentQuizIndex + 1} / ${quizLength}` },
            problem: { children: quizzes[currentQuizIndex]?.question },
            "Choice-a": {
              overrides: {
                "choice-text": {
                  children: (currentQuiz?.choiceText && currentQuiz?.choiceText[0]) || "",
                },
              },
              status: answerChosen == "Choice-a" ? (isCorrect ? "correct" : "incorrect") : "a",
              onClick: () => {
                answer(0);
                setAnswerChosen("Choice-a");
              },
            },
// -------
// some other code
// -------
            explanation: { children: explanation },
            Button: Object.assign(
              { onClick: () => onClickNextButton() },
              currentQuizIndex + 1 == quizLength
                ? { children: t("Finish"), variation: "error" }
                : { children: t("Next") }
            ),
          }}
        />
      )}
5.6 Amplify hosting
After confirming that it is in hand, the web app can be published very easily, as it will be built and accessible via https when the github repository is connected.

5.7 Amplify Domain management
After publishing with Amplify hosting, you can tie it to your desired URL. If your domain is registered with route53 or a subdomain of route53, it only takes a few clicks and 10 minutes of waiting for the connection to be completed.


5.8 Form Builder (React)
If you are entering or updating data related to the data model, Form Builder allows you to create an input form in a matter of minutes. In this case, we used it for a screen where users can enter what kind of quiz they want to generate automatically.

5.9 Environment variables

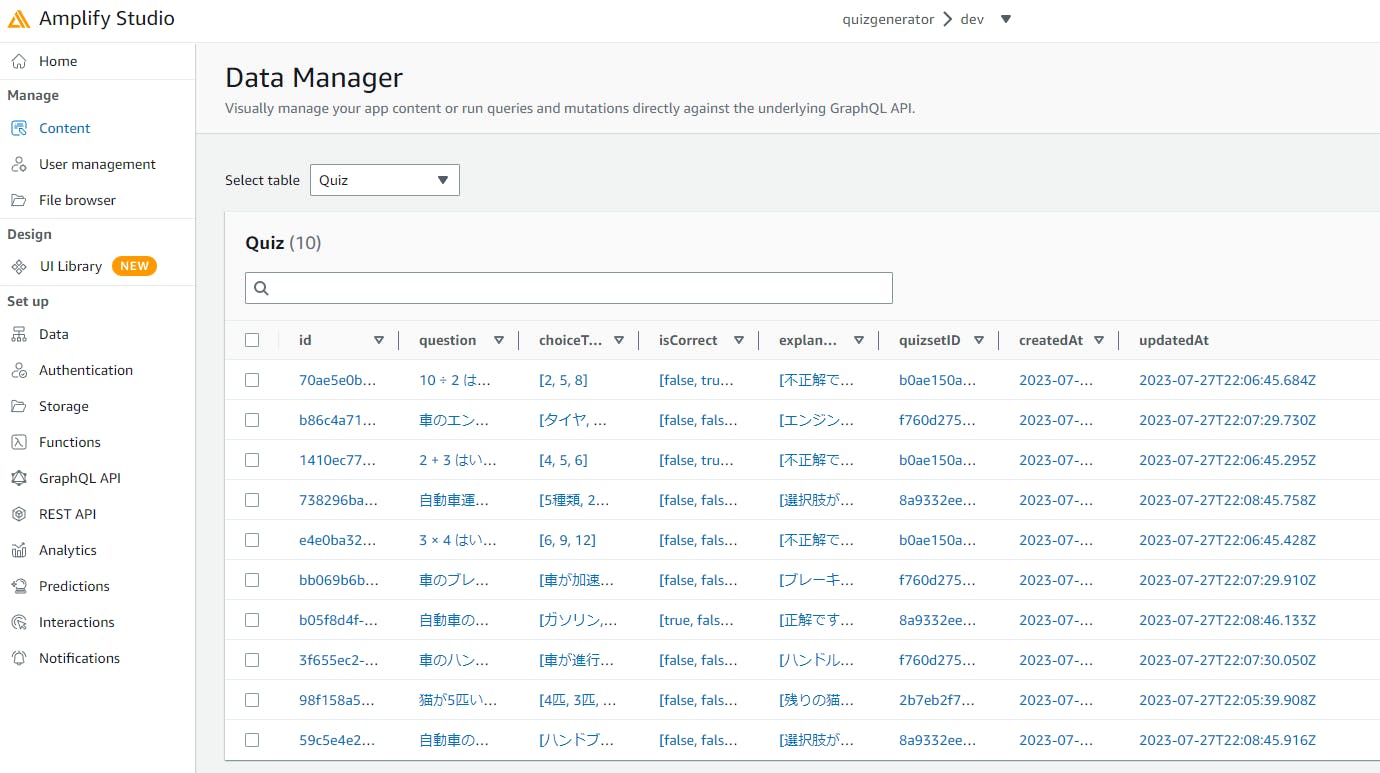
5.10 Data Content Management on Amplify Studio
After creating the Collection using the UI Library, we used the data created by DataManager's automatic data generation feature to make sure it was working well. I also used this feature to verify that the quiz was saved as expected.
6. Other Technology Used in Quiz Generator
6.1 ChatGPT API including functions calling
The ChatGPT API was used to automatically generate the quiz.
We asked ChatGPT "please provide quizzes with the following constraints. I wanted to treat it as data, so I used a feature called function calling, which was just released in June. This function is originally designed to call Web API via ChatGPT API, but it can also be used to return Json format.
const generateQuizzes = ({
  subject,
  level,
  numberOfQuiz,
  lng,
}: {
  subject: string | null | undefined;
  level: string | null | undefined;
  numberOfQuiz: number | null | undefined;
  lng: string;
}) => {
  const system_content = `
You are a good quiz questioner and will be randomly quizzed on a given level and subject.
You try not to give you the same quiz as the previous one.
`;
  const user_content = `
please provide quizzes with the following constraint.

# constraint must you have to follow.
subject: ${subject}
level: ${level}
number of quiz: ${numberOfQuiz}
number of choices for one quiz: 3
language for questions, answer, and explanations: ${lng}
`;
  const function_for_chatgptapi = {
    name: "i_am_json",
    description:
      "return quizzes based on subject and level, options, ansers, and explanations in json format",
    parameters: {
      type: "object",
      properties: {
        quizzes: {
          type: "array",
          items: {
            type: "object",
            properties: {
              question: { type: "string", description: "question based on subject and level" },
              choices: {
                type: "array",
                description: "choices for user to choose. only one choice is correct.",
                items: {
                  type: "object",
                  properties: {
                    choiceText: { type: "string", description: "option for user to choose" },
                    isCorrect: {
                      type: "boolean",
                      description:
                        "true if the option is correct, false if not. only one choice is correct",
                    },
                    explanation: {
                      type: "string",
                      description:
                        "explanation for the option. only one choice is correct. explanation is in three sentences with details",
                    },
                  },
                },
              },
            },
          },
        },
      },
    },
  };
  return {
    system_content,
    user_content,
    function_for_chatgptapi,
  };
};
export default generateQuizzes;
import axios from "axios";

const API_URL = "https://api.openai.com/v1/";
const MODEL = "gpt-3.5-turbo-0613";
const API_KEY = process.env.NEXT_PUBLIC_KEY;

const chat = async ({
  system_content,
  user_content,
  function_for_chatgptapi,
}: {
  system_content: string;
  user_content: string;
  function_for_chatgptapi: Object;
}) => {
  try {
    const response = await axios.post(
      `${API_URL}chat/completions`,
      {
        model: MODEL,
        messages: [
          // { role: "system", content: system_content },
          { role: "user", content: user_content },
        ],
        functions: [function_for_chatgptapi],
        function_call: "auto",
      },
      {
        headers: { "Content-Type": "application/json", Authorization: `Bearer ${API_KEY}` },
      }
    );
    return response?.data?.choices[0]?.message?.function_call?.arguments;
  } catch (error) {
    console.error(error);
    return null;
  }
};

export default chat;
6.2 Next.js App Router
For the framework, we used Nextjs in addition to React, and the latest App router which became Stable in May. The folder structure is a bit unique, but I was able to learn it through the development of the Quiz Generator.

6.3 i18-next, i18next-parser, json-autotranslate
Multilingual support was provided by i18next. The text in the component was also overridden and rewritten in the code using the t("") function obtained from i18next's useTranslation hooks. By doing so, the i18next-parser can be used to
yarn run i18next 'src/**/*. {tx,tsx}'
all text enclosed in t("") was retrieved in Json. For the extracted json
yarn json-autotranslate --input src/locales/ --config . /gcp-service-account.json --delete-unused-strings --type natural --source-language en
all text is automatically translated, and multilingualization and translation can be completed in a very short time. Even after more text is added, the same process takes 30 seconds and adds the text in each language to all language pages, making development very fast.
 <HeroSmallView
          overrides={{
            "Simple Quiz Platform where AI Creates Quizzes": {
              children: t("Simple Quiz Platform where AI Creates Quizzes"),
            },
            "Set the subject and level and the AI will create the quiz for you. When you answer, the correct or incorrect answer and an explanation will be displayed. You can also see the ranking of the percentage of correct answers and the number of quizzes answered by each user.":
              {
                children: t(
                  "Set the subject and level and the AI will create the quiz for you. When you answer, the correct or incorrect answer and an explanation will be displayed. You can also see the ranking of the percentage of correct answers and the number of quizzes answered by each user."
                ),
              },
            Button: {
              onClick: () => router.push(`/${lng}/quiz-generate`),
              children: t("Sign Up for Free"),
            },
          }}
        />

6.4 Sentry, LogRocket, Google Analytics
export default function RootLayout({
  children,
  params: { lng },
}: {
  children: ReactNode;
  params: {
    lng: string;
  };
}) {
  return (
    <html lang={lng} dir={dir(lng)}>
      <head />
      <body>
        <Providers>
          <GoogleAnalytics />
          <Header lng={lng} />
          {children}
        </Providers>
      </body>
    </html>
  );
}
Amplify.configure(config);

const Providers = ({ children }: { children: React.ReactNode }) => {
  useEffect(() => {
    Sentry.init({
      dsn: process.env.NEXT_PUBLIC_SENTRY_DSN,
      // integrations: [new BrowserTracing()],
      // We recommend adjusting this value in production, or using tracesSampler
      // for finer control
      tracesSampleRate: 1.0,
    });
    if (process.env.NODE_ENV === "production") {
      LogRocket.init(process.env.NEXT_PUBLIC_LOGROCKET_ID || "");
    }
  }, []);

  return (
    <Sentry.ErrorBoundary>
      <AmplifyProvider theme={studioTheme}>
        <Authenticator.Provider>{children}</Authenticator.Provider>
      </AmplifyProvider>
    </Sentry.ErrorBoundary>
  );
};
6.5 react-modal, react-spinners
const ModalMenue: FC<{
  isOpen: boolean;
  setModalToOpen: React.Dispatch<React.SetStateAction<boolean>>;
  lng: string;
}> = ({ isOpen, setModalToOpen, lng }) => {
  const { t } = useTranslationClient(lng);
  const router = useRouter();
  return (
    <div>
      <Modal isOpen={isOpen} style={modalStyle}>
        <Center>
          <MenuView
            overrides={{
              "close-circle": {
                onClick: () => setModalToOpen(false),
                className: "custom-btn",
              },
              "home-button": {
                onClick: () => {
                  router.push(`/${lng}/`);
                  setModalToOpen(false);
                },
                className: "custom-btn",
              },
              "quiz-generate": {
                onClick: () => {
                  router.push(`/${lng}/quiz-generate`);
                  setModalToOpen(false);
                },
                className: "custom-btn",
              },
              "quiz-list": {
                onClick: () => {
                  router.push(`/${lng}/quiz-list`);
                  setModalToOpen(false);
                },
                className: "custom-btn",
              },
              "user-ranking": {
                onClick: () => {
                  router.push(`/${lng}/user-ranking`);
                  setModalToOpen(false);
                },
                className: "custom-btn",
              },
              signout: {
                onClick: async () => {
                  await DataStore.clear();
                  await Auth.signOut();
                  await setModalToOpen(false);
                  router.push(`/${lng}/`);
                },
                className: "custom-btn",
              },
              Home: { children: t("Home") },
              "Generate Quiz": { children: t("Generate Quiz") },
              "Quiz List": { children: t("Quiz List") },
              "User Ranking": { children: t("User Ranking") },
              "Sign Out": { children: t("Sign Out") },
            }}
          />
        </Center>
      </Modal>
    </div>
  );
};
7. About Me
My name is Tanosugi I am from Japan and living in Japan. I worked part-time using Visual C++ when I was a student long years ago, but now I have a non-engineering job. 3-4 years ago, I read a book published in Japan, "Let's start development by yourself!" and wanted to practice it, so I resumed coding as a hobby. After studying React, Django, AWS, etc. at Udemy, I have been making various web services by myself. Some of the services are for my kids.
8. Conclusion
I coded every day after the kids went to bed, so that's a total of 30-40 hours in 1 weeks, including article writing. If it is an intensive hackathon, it takes 2-3 days.
I was able to create the application, I could join the hackathon, and I was able to confirm the usefulness of Amplify, so it was a very meaningful time for me.